I have been lacking terribly in the blog post department.
I was lazy have a good excuse.
I have been diligently working on a project.
I'm happy to say I have finished my first weighted quilt!
I had a goal of getting it done in two weeks.
I'm laughing too.
It took four weeks to get it done. Not bad considering I had never done this.
Making a weighted quilt is not hard but it is challenging.
The quilt gets heavier and heavier as you go.
Let's just say I had quite a workout toward the end!
Every quilt I've worked on seems to have its own story.
It's true that a part of the maker goes into each quilt they make.
I'll miss this one but I know it's going to a good home.
This post is about the process. I'm making another post dedicated to it's finish.
The basic rundown of this quilt goes something like this:
Make two quilts, sandwich them together, add weights, sew closed.
Simple process.
I pieced together the backings for the two quilts from large pieces I found at the thrift store.
The two quilts are placed back to back so nobody will see the back of each quilt.
This photo is the back of one of the quilts.
This is the first time I have free motion quilted (FMQ) anything of this size.
I practiced a lot!
The quilting shows up really well on the back.
I purposefully chose thread that would blend in on the front.
Even though I practiced a bunch there are plenty of mistakes.
I decided not to take pictures of the mishaps.
Trust me, they're there.
I'd rather celebrate accomplishments. :)
See how the black thread disappears?
You can't see my mistakes. ;)
Free motion quilting is done with a darning foot.
I move the fabric around while the machine makes stitches.
I learned really quickly that I needed to mark a box to sew in (the faint yellow lines).
That kept me from sewing over my previous areas...which happened several times.
The yellow pencil marks disappear when washed.
I only had about an 8" x 18" area left to quilt on the second quilt
when I found a teeny tiny screw on my black fabric.
I looked and looked for something that was missing a screw.
Nothing seemed amiss so I kept on sewing.
Then my needle fell out.
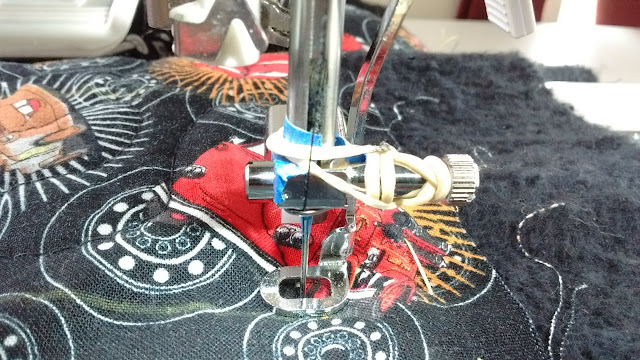
That little screw turned out to be the set screw for the needle clamp assembly.
Kind of important.
I'm amazed I found it and thankful it didn't get lost!
After calling Singer and consulting Google...
and applying some I-want-to-get-this-done-and-not-order-a-part-right-now ingenuity
I was back in business.
The rubber band didn't last long but the tape still did its job.
After both quilts were quilted they got trimmed to the same size.
Then I basted them together and sewed along three sides, leaving the top open.
Next I marked a grid and sewed long columns.
Then I measured the poly pellets.
I put 1 ounce (about 28 grams) of pellets in each pocket.
It just so happened that a large cookie scoop held exactly 1 ounce.
It made measuring go a lot faster!
After the first two rows I came up with this system to fill each pocket.
There were twelve rows with ten columns.
So that's 120 poly pellet filled pockets!
Sorry for the bad picture.
This is what I used to fill the pockets.
Two vacuum cleaner hose extensions taped to a wrapping paper tube.
I also taped a funnel at one end.
And yes, I Clorox wiped the inside of the vacuum hoses!
Because I'm short, I spread the quilt over the couch.
Then I could run my funnel contraption to the bottom of each column.
Each column was filled with one pile of pellets.
I pinned each row closed just below my sewing line.
Then I carefully lifted the quilt to the sewing machine.
Even though I pinned each row closed I still had some wayward pellets.
I was very careful to not sew over any of them.
That would definitely break a needle!
Row by row the quilt was filled with pellets.
Connor helped fill a few pockets.
My MIL helped one afternoon as well.
It was much easier with two people handling the quilt once it got heavier.
How heavy is it?
15.2 pounds!

I have finished this quilt and given it to the family.
However, they have not given it to their son yet so I won't post final pictures until they do.
I really don't want to spoil the surprise!
I enjoyed working on this project even though it became a challenge as the quilt got heavier.
I learned a lot with this quilt. I have a little more confidence in my ability to FMQ.
It's not quite as scary anymore.
And now I know how to work with poly pellets!


